
It’s Friday, it’s February; there are no trains running but we must get a railway fix, so it’s time for a Shed Turn. As a volunteer, I can do whatever hours I like but when I am on the railway I like to put a full day in, so I start and finish with the shed staff.
Today, the early morning sees a departure from the boiler shop - a newly refurbished boiler heading back to join its frames at a railway in Belgium.

Further along the back road, the S&DJR Fowler 7F waits its turn for more attention to the springs. Behind it is the Grafton steam crane, which is waiting collection by it’s new owners - it will head down to Sheringham soon for road transport to, I think, Whitwell.


And a bit later, we have the two crossheads on the bench, awaiting inspection. I’ve cleaned the drop arms and the union link, still fitted to the one in the foreground.

The next jobs are all about inspecting & refurbishing various valves & other equipment. While nosing about, I noticed that the faulty regulator was still out, noticeable by it’s absence in this view through the dome. Those are mainly fire tubes you can see beneath it; notice the operating rod passing out of the boiler toward the top of the picture an the main saturated steam pipe heading off to the right, towards the smoke box:


Our next job was to remove the two injectors for cleaning, which was to take most of the rest of the day. Here’s one, withdrawn from it’s housing under the fireman’s side of the cab:

Have a look at this diagram:

The parts we have removed are the black sectioned bit in the middle, including the delivery cone, the renewable nozzle and the combining cone with it's flap. Here it is again, after an hour in the descaling bath:

It doesn’t look too bad does it. We needed to strip it further for cleaning, which involved splitting the two halves. In that square block in the middle, on the RH side of the big thread is an anti-rotation pin which prevents the two halves coming undone. We spent about two hours removing two of those pins before we were able to split the two halves and finish cleaning the injectors.

Have another look at the diagram. Here I have my spanner on the delivery clack inspection cap nut:

Here's the clack valve, before cleaning:

And here is the clack valve seat as I found it:

Here it is again, after 15 minutes work with some fine grinding paste. You often get a whiff of steam out of the overflow when the injector is not running, which is a result of the two clacks leaking.

Next we turn our attention to the top clacks. Keirhann & I are now high up on the running boards, and we have strapped ourselves to the hand rails to save any accidents. We are throwing our weight about a bit up here, using flogging spanners and it would be easy for a slip to result in disaster for one or both of us. In the end, the only disaster was to this spanner as we shall see:

You get calcite growth on the threads of these caps which makes them quite stiff. We had spent a while belting the spanner with a hammer to get the nut to move, and you can see Keirhann is putting some effort into getting this cap off:

Here's the seat. It took me the best part of an hour to regrind it:

The other clack was worse. We hammered at the nut, or Keirhann did while I held the spanner in place, and eventually the end of the spanner moved. Unfortunately, the nut didn't:

This shows us why you use a proper forged flogging spanner when things are really tight - because cast tools will break. Fitter Bob welded it up again, and we took the propane torch to the clack body, which we probably should have done earlier as it came undone quite easily with a bit of heat on it.
Volunteer John was in today treating Wissington's wheels to some green undercoat:

For me, that was the end of the day. It was Friday afternoon, and all that remained was to tidy up and make sure we were ready for others to carry on after the weekend.
My next time on the railway will be a cleaning turn on Thursday 20th February - it is school half term week and we have a yellow service running (steam hauled train and a DMU, running four trips each). The B12 will be out - hopefully we will have some decent weather to show her off in her last year in service before her next overhaul.
Today, the early morning sees a departure from the boiler shop - a newly refurbished boiler heading back to join its frames at a railway in Belgium.

Further along the back road, the S&DJR Fowler 7F waits its turn for more attention to the springs. Behind it is the Grafton steam crane, which is waiting collection by it’s new owners - it will head down to Sheringham soon for road transport to, I think, Whitwell.

Today however is going to be centred on the continuing winter maintenance on 76084, the BR Standard 4MT 2-6-0 currently in residence, affectionately know as the Pocket Rocket. It’s part way through a valve & piston overhaul; the valves I cleaned a couple of weeks ago are in the machine shop and the railway are manufacturing some new piston rings, judging by the pile of broken ones I saw laying about.

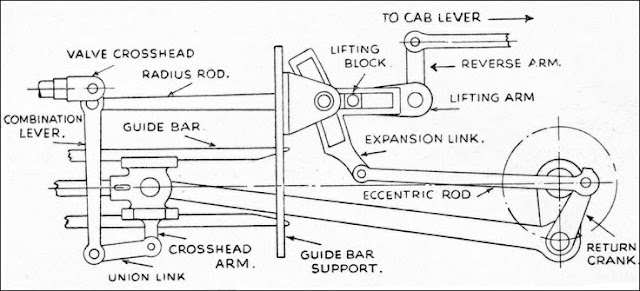
Today, apprentice Keirhann & I are going to remove the cross heads which are currently tied in place with blue rope. In this shot, we have removed the drop arm and union link, and we’ve positioned a hydraulic table behind the guide bars ready to catch the heavy crosshead when we pull it out.

And a bit later, we have the two crossheads on the bench, awaiting inspection. I’ve cleaned the drop arms and the union link, still fitted to the one in the foreground.

The next jobs are all about inspecting & refurbishing various valves & other equipment. While nosing about, I noticed that the faulty regulator was still out, noticeable by it’s absence in this view through the dome. Those are mainly fire tubes you can see beneath it; notice the operating rod passing out of the boiler toward the top of the picture an the main saturated steam pipe heading off to the right, towards the smoke box:

Here’s a different loco, with a similar (though not identical) regulator. This is the GCR Stanier 8F, 48305. This still has the regulator operated with a longitudinal shaft from the centre of the back head, rather than the later radial shaft used in the BR Standard locos, but it gives you a good view of the first (or ‘pilot’) valve on top of the second (or ‘main’) valve beneath. These are arranged so that the initial movement of the driver’s lever opens the smaller valve, followed by the larger valve with more lever movement providing better control of the steam flow.

The reason I was on the running board was to help Keirhann replace the steam heat valve, which he had serviced, re-cutting the seat earlier in the week. This was a straightforward job, but some of the bolts were a bit tricky to get in and tight due to the mounting bracket.

Our next job was to remove the two injectors for cleaning, which was to take most of the rest of the day. Here’s one, withdrawn from it’s housing under the fireman’s side of the cab:

Have a look at this diagram:

The parts we have removed are the black sectioned bit in the middle, including the delivery cone, the renewable nozzle and the combining cone with it's flap. Here it is again, after an hour in the descaling bath:

It doesn’t look too bad does it. We needed to strip it further for cleaning, which involved splitting the two halves. In that square block in the middle, on the RH side of the big thread is an anti-rotation pin which prevents the two halves coming undone. We spent about two hours removing two of those pins before we were able to split the two halves and finish cleaning the injectors.

Have another look at the diagram. Here I have my spanner on the delivery clack inspection cap nut:

Here's the clack valve, before cleaning:

And here is the clack valve seat as I found it:

Here it is again, after 15 minutes work with some fine grinding paste. You often get a whiff of steam out of the overflow when the injector is not running, which is a result of the two clacks leaking.

Next we turn our attention to the top clacks. Keirhann & I are now high up on the running boards, and we have strapped ourselves to the hand rails to save any accidents. We are throwing our weight about a bit up here, using flogging spanners and it would be easy for a slip to result in disaster for one or both of us. In the end, the only disaster was to this spanner as we shall see:

You get calcite growth on the threads of these caps which makes them quite stiff. We had spent a while belting the spanner with a hammer to get the nut to move, and you can see Keirhann is putting some effort into getting this cap off:

Here's the seat. It took me the best part of an hour to regrind it:

The other clack was worse. We hammered at the nut, or Keirhann did while I held the spanner in place, and eventually the end of the spanner moved. Unfortunately, the nut didn't:

This shows us why you use a proper forged flogging spanner when things are really tight - because cast tools will break. Fitter Bob welded it up again, and we took the propane torch to the clack body, which we probably should have done earlier as it came undone quite easily with a bit of heat on it.
Volunteer John was in today treating Wissington's wheels to some green undercoat:

My next time on the railway will be a cleaning turn on Thursday 20th February - it is school half term week and we have a yellow service running (steam hauled train and a DMU, running four trips each). The B12 will be out - hopefully we will have some decent weather to show her off in her last year in service before her next overhaul.
No comments:
Post a Comment